
It was evident from the start that the telescope was going to be a long way above the ground and that I would need a way of getting up to it. I am using a GEM mount and I have two or three telescopes that I may wish to attach to it. Therefore I had to be able to get to the mount safely and securely with a large OTA to be fitted to a dovetail saddle. Experimenting with the tripod that came with the mount (Why is it not possible to buy a mount without a tripod?) I decided I needed to be standing about 76 cm (30 inches) below the base of the mount when mounting an OTA. But I didn't want to be so high when actually looking through it. So measuring down from the top of the pier determined where I wanted a platform to stand on when mounting optics. This can double as a desk when imaging. Measuring down again determined that I wanted a floor 120 cm (47 inches) above the concrete base. This gives me some very valuable storage space underneath.
This raised the problem of getting up there bearing in mind that the flat part of the ceiling is only 117 cm (46 inches), and the eaves only 100 cm (39.5 inches) above the raised floor. My builders were concerned that I could get up there safely without banging my head, so insisted that they build steps that ended under the dome. This is closer to the pillar than I would have liked but they are probably right. It just means I cannot sit on the western side of the mount. (Original ideas to hinge the floor so that I could cover the stair well and not fall down it in the dark were finally deemed impracticable, as was a railing around the hole.)
|
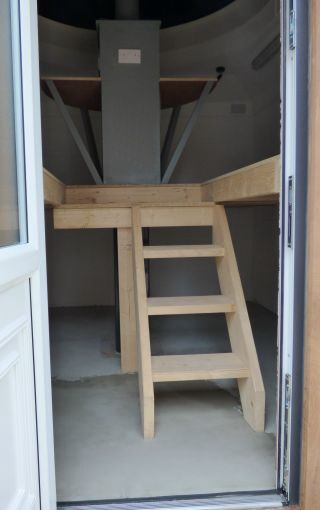
This is a picture looking in at the doorway. The steps are obvious up to a low platform from which I can go either way onto the first floor. You can also see the platform/desk. The builders suggested putting some non-slip surfaces on the steps; I don't really think it necessary but we will see. All the bare woodwork was later painted grey with the same paint used on the other woodwork here. |

|
And here is the interior seen from upstairs in the south-east corner. The dome is open to allow in natural light and the Sun came out and is shining on the desk. You can see the electric drive for the dome in the background. Its power socket is in but it is fed by a large transformer wired permanently to the controller and I have yet to work out the best place to put it as it has no obvious way to fix it to anything. (In the picture it is sitting on the dome itself where it obviously cannot stay.) The thin white line in the upper-right of the picture is the chord that opens and closes the shutter. A cleat is provided to tuck it out of the way but I haven't fitted that yet and here it is looped over the securing knob of the clamps that secure the dome when not in use. These clamps are an optional extra and not really necessary but cost only Ł39 and seemed like a good idea. (A determined thief could, in theory, lift the dome off to gain entry, and a tornado might lift the dome off too.) I have a double socket on each side of the pillar. These will provide power to computers, battery charger, cameras, dew control and, probably, a table lamp. In addition I have two more sockets on the back wall just in case I need them. The bolts sticking out of the top of the pier are there to prevent paint going into the threaded holes. They will be removed when the pier adaptor is fitted. |
|
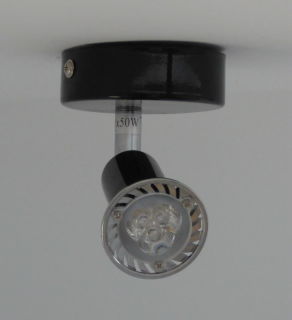
I have a light like this in each corner of the building. They are fitted with red-LED, G10 lamps and are quite bright. They can be turned to point in any direction so that, if they are too bright, I can turn them to the wall for a more diffuse light. I didn't feel it necessary to be able to switch them individually—I hope I am right. I also have a white strip light along one wall to provide general light for setting up as the only window is in the door. (I didn't want any windows at all, but was persuaded that it would not be safe to have an outward opening door without being able to see from the inside if there was someone standing outside.) |