
As will be well known to any astronomer using a refractor or a catadioptric telescope (that is any telescope with an optical component at the front of the optical tube), as the telescope cools down dew tends to form on that front component. This happens because the telescope cools by radiation to the sky more rapidly than the air does. If the temperature of the front component falls below the dew point of the air, then dew forms on it. There are conventionally two ways of combating this problem:
It seems to me that there are disadvantages to both these approaches.
My idea was to use a short dew shield and to blow a slow stream of dry air into it. Hopefully this would reduce the amount of water vapour in the air in front of the corrector plate to the point where it would not condense out. In addition, the flow of air at ambient temperature may reduce the extent to which the corrector plate cools below ambient.
There are a number of desiccants that could be used and there would be an advantage, in my arrangement, if it was a liquid one. However I do not know of a liquid desiccant that would be both safe and convenient to use. To me the obvious desiccant was silica gel. This is a crystalline material which is inert and completely safe (it is a sort of hydrated sand), and it can be regenerated in an oven at 110°C. It can also be bought self-indicating—that is it changes colour when it needs regenerating. There are a number of different indicators, but in my view the best is one that is blue when dry and goes pink when the silica gel is about half saturated. This contains 0.5% Cobalt Chloride and Health & Safety consider Cobalt hazardous, but it is trapped within the silica-gel granules and I have been handling it on and off for the last 50 years and, as far as I can tell, I have suffered no ill effects. I use it without concern and it can be purchased without restrictions (in the UK anyway). I do have an alternative using an organic indicator which goes from yellow to green but this is unstable and only lasts a few regenerations. There is also one containing an iron salt which is stable, but I have no experience of that. The blue-pink variety turns fully pink at a relative humidity of 40%, which I believe may not be adequate, but if the top of the column is still blue, the relative humidity is below 20%, which I believe will always be adequate.

My original container for the silica gel proved very unsatisfactory and it was not long before the glass tube running down the bottle broke (all by itself!!). So I replaced it with a pair of plastic tubes shown in the picture. These are 20 cm long and 2 cm in diameter and are connected in series. The air enters at the bottom-right and exits from the botton-left. A little plug of cotton wool or similar is needed at the bottom of each tube just to prevent fine particles of silica gel from blocking the tubes. The idea is that when the first tube becomes nearly saturated the gel can be replaced, and the second column acts as a backup if the first becomes saturated during an imaging session. I only implemented this at the time I moved house, abandoned my roll-off-roof and built a new observatory with a dome (see here). Since then I have had very little problem with dewing so have not needed to use it. I don't doubt that it will work just as well.
I use a pump designed to deliver an air stream to an aquarium. I started with a very small one I happened to have which delivered less than a litre per minute. I concluded that this was not adequate but I was using a different form of silica gel at the time and I'm not convinced that it had not become exhausted, so the jury is still out on that one. I bought another pump which delivers 3.5 litres per minute and that is certainly adequate. It has two outlets, so would be easy to use at half speed by only connecting one of them. Suitable tubing is available from eBay or any shop selling aquaria and fits the pump, but is too small for the plastic tubes so some adaptation is needed. This has the advantage that the connections are easily disconnected when the tubes need refilling.
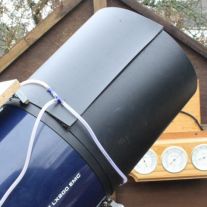 From the same place I got the pump I was able to buy some T-connectors. They came in packs of five. I needed one at the pump to join its two nozzles into one tube, and another at the dew shield to connect the delivery tube to a loop of tubing encircling the dew shield. This left three, and I used them to deliver air to the inside of the dew shield. I made three small holes in the shield (it is plastic) spaced approximately at 120° around the cylinder, and pushed the vertical part of the T-connector through it and used its other two legs to continue the loop.
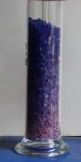 I have run the system for three hours with an ambient relative humidity of 80 to 90% and got no dew whatever on the corrector plate. The rest of the telescope was wet. The effect on the silica gel can be seen in this picture (of my old container) which was taken after that session. The layer at the bottom is pink but further up it is still blue. This shows that the relative humidity of the air was less then 20% by the time it exited from the top of the column. I don't have a suitable sensor to measure the actual humidity, but, at 20% relative humidity, condensation should not occur until the face plate reaches almost 20° below the temperature of the air.
I mentioned this work on the LX200-Classic group on group.io (www.groups.io/LX200-Classic) and was pleased to discover that others have implemented this idea. One very impressive version has been made by Jack Thewlis, who has made some significant improvements.