
Everyone makes mistakes, and I make at least as many as anyone. I try to learn from my mistakes but I expect others have made the same mistakes and, if I had known, maybe I could have avoided them. So here I admit to my mistakes hoping that others can learn from them, and I explain what I did to correct for them. 1. The whole structure is made from sawn timber. This has been perfectly satisfactory for most purposes despite the fact that sawn timber is never truly straight. My mistake was to use sawn timber for the runners and rails. It would have been much better to have used planed timber as it is generally much straighter. I think the reason was that it was not available in the thickness of the sawn timber and I was concerned about its strength. However the main strength is imparted by the gravel boards which effectively increase the thickness of the rails to 150 mm. 2. The roof is wider than I designed it and I don't fully understand why. The roof trusses were very carefully cut and made to the right width. When I assembled the roof, I clamped the runners in the correct positions using 47×50 timber between them and ensured the width at the two ends were the same to the millimetre. As soon as I had the trusses up I could see that the runners had moved apart about a centimetre. I took it apart for the night as it was rather windy so, when I put it back together again, I tried to correct the situation but failed, and the wheels on the side with the curved track were getting rather too near the edge, so I moved them in by providing 19-mm blocks on the inside of the rail. (I provided these with sloping ends so that they would guide themselves past the end wall.) By the time I had added the roof panels, the wheels on the other side were very close to the edges of the rails, so I added 47×22 timber along the other rail, and now it runs nicely and reproducibly. 3. I should have left the addition of the securing bolts at the far end until the roof was complete. As it is I have made a right mess of the ends of the runners as I keep making sure the bolts go into their holes. Once the roof was complete and I felt that it had settled to its final size, I filled the holes with what I believe is generically called "epoxy putty" (in the UK the trade name is Tufmix). This is a two-part material with a putty-like consistency; the two parts are mixed together and remain pliable for a couple of hours but eventually sets hard. Once I had filled the holes, I closed the roof, driving the bolts into the putty. To my surprise, when I opened the roof again, the bolts came out cleanly leaving a hole in just the right place. I cleaned the putty out of the threads by undoing the nuts, and then left the roof open for 24 hours by which time the putty had set enough that no more scraped off when I closed the roof. I think it took several days before it was fully set. Eventually I ran an 8-mm drill down the hole to deepen it slightly so that the roof closed fully and easily. 4. When I put in the joists to support the floor, I put them carefully at right angles to the side frames. What I forgot to do was ensure that the whole structure was truly square. When I completed the roof, I realised that the rear wall was not truly at right angles to the sides. This was easy to correct by moving the whole side, but the floor joist are no longer at right angles to the sides. Once the floor is in place only you, I, and the gods will know, although it won't be a major problem to correct. (Only the gods and I know if I ever did....) 6. Another minor mistake was not brace the frames with diagonal braces or add the cladding before I put on the roof. Rolling the roof back and forth during construction caused it to hit its end stops quite hard and I think this knocked the whole frame slightly out of square. I didn't realise this until I made the cupboard and nothing seemed to fit quite right. When the ply was fitted, the walls remained rigid when I removed the temporary braces. 7. A moment's inattention almost spoiled the roof. It is covered in three strips of felt laid horizontally. I measured carefully, and cut the three sections. I laid the two at the bottom perfectly. When I laid the top piece, I made sure it was symmetrical about the ridge, but laid it 5 mm too far to the far end. I didn't realise this until it was pinned in place along the roof. Cutting it to fit at the long end was simple, but it was only just long enough to go over the other end, and does not match the lower sections. Cosmetic only fortunately. 8. I had intended to place the pillar in such a position that the declination axis of the telescope was on the centre line of the building, which meant displacing the pillar to the south. I'm not sure what happened but the pillar has turned out to be on the centre line. I realised this when I fitted the floor but it was too late to do much about it then. The result is that the space north of the telescope is a bit tight for an observer, but there is no risk that cameras will hit the wall. This is why the table is in the north-west corner rather than the north-east corner as I had planned it, and all access to the far end is round the southern side of the pillar. It is little more than a nuisance.
One of my pieces of timber was significantly bent, fortunately in its longer direction (it is 75×47 mm), so I put it in the framework on the basis that the bend was not so great that the wheels would run off. I should have gone back to the shop and selected another piece, although it has worked out all right.
Where a slight lack of straightness really did matter was its effect on the wheels. Although the wheels are strong enough for two on each side, I had decided to use three to be on the safe side. However when I fitted three, I found that only two were in contact with the rails at any one time, so I had to remove one from each side.
Presumably the roof trusses have given slightly under the load of the roof, resulting in a spread of about 25 mm. It will be interesting to see what happens when there is a load of snow on top. One end will be supported by the bolts through the rear wall. I am considering some way of providing the same support at the other end too. (The bolts that prevent the roof opening or lifting off will not prevent it from spreading.) It may be a case of watching the weather forecast and engaging extra support if snow is forecast.
I minor result of this spreading is that the roof is no longer centred on the framework. This only matters at the far end where I have had to add custom-made end plates to close the gaps between the roof and the end wall to make it water tight.
(The manufacturers of Tufmix say that it should be used within 30 minutes of mixing and don't say how long it will take to set. I have had this for several years and I seem to remember that it set hard in 24 hours. This time it certainly remained usable for more than 30 minutes and had not set fully after 24 hours. Maybe it doesn't keep that well.)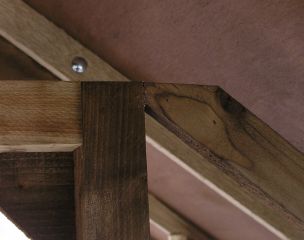 5. A minor mistake, but it taught me something which may have saved me trouble later. When I designed the doorway, I had a choice—the narrower I made the doorway, the higher it could be. In order to maximize both, I made the top corners come very close to the sloping sides that define the roof section. The consequence was that the timbers defining that edge ended up with only a very small area of contact with the door frame. There was no room for a screw, but the wood is only there to support the edge of the cladding so didn't need to be particularly strong. So I simply glued it in place with urea-formaldehyde glue which is supposed to be very strong ("stronger then the wood"). However, there was not a lot of natural rigidity in the structure before the cladding was added, so as I built the roof and kept moving it back and forth, each time it closed it pushed on the door frame, and eventually I noticed that the glue joint had failed. I had tested this glue with the treated timber on larger areas of contact and it made a strong joint which I have been unable to break, so it can work, but may not without the support of screws. I shall add a strip of timber along the top of the door frame to give more support and room for screws. When I started to make my external cupboard, I had to have three pieces of wood joining at the same point and originally planned simply to glue the joints. I actually gave up this idea when I found that the size was about 10 cm longer than my sash cramps. I had to glue one joint and hold it together with a single screw into the end grain (not ideal but the screw did up nice and tight). I could not do the same thing in the other direction (the screws would have to pass through one another in the middle), so I positioned them using the sash cramps, one end at a time, and supported the joint with corner plates.