
Here I will discuss a few general points about the construction and, for the benefit of readers from outside the United Kingdom, I will attempt to explain any references which I think are specific to the UK.
I am not an engineer, but I have used the engineering principle of "make it to specification as cheaply as possible". Also, this is constructed to serve a purpose and not as a decoration, so I have concentrated on a building that is functional, and I have given little consideration to what it looks like. My neighbour has asked me twice "Why do you have to build it there?", implying he doesn't like the idea of being able to see it, so I have been a little concerned that it looks reasonable from his direction but I have not changed the design to accomodate him. He started by threatening to complain to the planning authorities, so I have been careful to comply with the conditions that brings this into what the planning people call "permitted development". This includes the overall height, so I did redesign the roof somewhat to ensure that I stayed within limits.
1. Dimensions.
All dimensions are given in millimetres (mm). For our American friends there are 25.4 mm to the inch. Although Britain is officially a metric country there are various ways in which we stubbornly hold on the the old imperial units. One example is wood. Plywood, for example, is sold in sheets 2440×1220 mm which translates to 8 feet by 4 and, to my knowledge, has been the standard size for at least 50 years, and it comes in thicknesses of 6, 9, 12, or 18 mm. Similarly timber comes in lengths of 1800 mm or 2400 mm (just under 6 feet and 8 feet respectively). I have worked exclusively in millimetres (but can I find a rule marked only in millimetres? No!) because I never could get my head round fractions of an inch (is 11/32 greater or less than 3/8?), and working in millimetres engenders a fair degree of accuracy.
2. Fixings.
Screws are a right mixture of metric and imperial. We can buy 50-mm screws; we can buy 2-inch screws. Metric sizes represent the diameter of the clearance hole, so an M8 screw requires an 8-mm hole, but we can buy No.10 screws too. I've predominantly used 2-inch, no.10 and 1¼-inch, no.8 brass screws for the framework and 1¼-inch, no.8, black-japaned, round-headed screws for the cladding. I like brass screws; they don't rust and they always come with slotted heads. It is getting more and more difficult to get slotted heads these days and I don't like cross heads. I know it is easier to engage an electric screwdriver with a cross-head screw but it also jumps out more easily which damages the screw and the bit. Also they are much softer than either steel or brass screws (I assume because of the difficulty of forming the cross head in steel or brass). I have never sheared off a brass screw when driving it in, but I have sheared off a cross-headed screw when driving it into a piece of my 47×50 timber. In a few places I've needed screws longer than 2 inches and I happen to have a box of steel, 3-inch, no.10 screws so I have used those. Generally I have secured metal work with the screws provided with them even though these are cross-headed.
The framework is bolted together with 110-mm M8 coach bolts except in a couple of places where I needed longer ones and I used 130-mm M10 bolts. The roof trusses are each secured with four 50-mm M8 bolts. I've used what my supplier calls "penny washers", which are 25 mm in diameter (about the same as the old British penny), as these spread the load better than a normal washer. I like coach bolts; they have rounded heads with no slot but with a square section at the back of the head which digs into the wood to stop it rotating. Sometimes they are threaded all the way, sometimes for only a quarter or half of their length.
3. Suppliers.
Wickes (pronounced Wicks) is a general builders' merchant. My local store is not very big but I find it more reliable than B&Q, and it has a good range of pressure-treated timber. They also sell packs of most timber at a significant discount over the single price. I have recently discovered Toolstation which is excellent for all sorts of hardware at excellent prices, and they will ship free for orders over £10. They only sell screws in boxes of 200, but I have used more than one box of 2-inch, no.10, brass screws (£13.72) and obtained all my carriage bolts from them. The wheels are from Bickle, a German company but with an outlet in Milton Keynes through which I could order via their web site. They have an enormous selection of wheels and castors and I found their sales department very helpful. I'm lucky in having a pretty good local hardware shop in the village from whom I can get screws in smaller quantities. I bought a mitre saw, which has proved invaluable, especially for this project, from Homebase, a general DIY store.
4. Preservative.
All the timber I have used is pressure treated with preservative and would last years buried in the earth. However I don't know how far into the timber the preservative penetrates, so I have treated all cut surfaces with Cuprinol Shed and Fence. When I started DIY about 50 years ago there were only two preservatives around, Creosote and Cuprinol. Both were very effective but Creosote needed to be reapplied every year or two and remained toxic to plants at all times; Cuprinol, on the other hand, needed to be applied only once and was not toxic to plants once dry. (I built a shed 40 years ago and treated it with creosote which was originally renewed annually but hasn't been for at least 20 years and it is still sound, but the back has a nice covering of something green.) These days there are "57 varieties" of Cuprinol and the manufacturer's service department were very vague when I asked them which was the original but I decided that Shed and Fence was likely it. It is a solvent-based product, available in a selection of colours, which soaks into the wood and I have fence posts sunk into the ground which are still sound after 30 years. The manufacturer recommends standing the timber in it for 3 minutes, but I generally leave it soaking for at least an hour and often much longer. For items too large to be stood in a pot, I apply two generous coats with a brush. Eventually I shall paint all wood with Cuprinol in order to give a consistent colour.
5. Ply Wood.
All ply wood is exterior grade, known as WBP (water and boil proof), but this applies only to the glues − the wood is not protected, so all ply has to be treated on both sides with Cuprinol. Ply comes in sheets 2440×1220 mm and my walls are 1500 mm high so the cladding has to be in two pieces. I seal the junction and the junction with the gravel boards with an acrylic sealant. The wall cladding is 6 mm thick and is held in place by black-japanned, round-headed screws. The main strength of the walls is in the framework and the cladding establishes rigidity and will keep the rain out. The bracing pieces in the roof need to be much stronger and are 12 mm thick and are bolted in place. The roof panels are a compromise at 9 mm thick. The shuttering for the concrete pillar was made from 12 mm ply. Most of the ply came from Wickes who delivered it along with all the timber (free if over £300) but when I realised I had overlooked the gable ends and so would need more, I got it from B&Q because they have a cutting service and so would cut it so that I could get it into my car. Wickes sell half sheets at 80% of the price of a whole sheet.
6. Adhesives
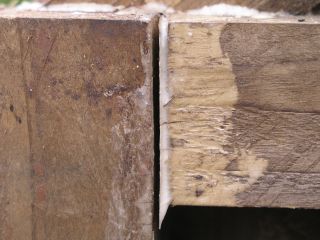 At first I used a PVC adhesive, but then I realised that it is water-based and might not set properly when used with treated wood. Indeed a joint which had only been glued did come apart when stressed after being clamped for several hours, but another seems to be holding after several days. (Neither of these was part of the building.) So I decided to change to a urea-formaldehyde adhesive which sets by a chemical reaction between its components. I had used this type of glue (Aerolite) 40 years ago on a garden shed and it worked very well. Toolstation did not stock Aerolite but recommended Resintite, a one-part powder adhesive. It is made up with water and is usable for an hour or so and sets finally in 6 hours forming a very hard, but brittle solid which is claimed to be stronger than the wood. I used this for most of the glued joints. However I have had three non-critical joints fail at the junction of the adhesive and the wood. In both cases the area of contact was quite small and the joint was subjected to a bending stress (see picture). I have little experience of this glue so I may not have prepared it to the right consistency. So I have not relied on the glue and all joints are secured with screws. The glue fills gaps and has been useful for that purpose.