It is essential for any telescope to realise the full potential of the carefully crafted optics that they are accurately aligned with each other and the body of the telescope. When correctly aligned the optics are described as being 'collimated'. In general refractors of the size used by amateurs (rarely larger than 6" diameter) normally do not require collimating unless they have been severely mishandled or dismantled, because the optics only consist of a single unit - a strong cell containing the glass lenses correctly aligned and spaced. Sometimes they can be out of alignment with the telescope axis, this can usually be corrected with adjustment screws, either at the focuser end or the lens cell itself.
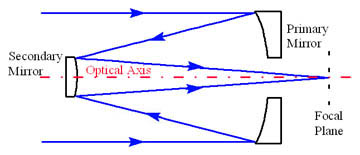
But reflecting telescopes, of which the GSO RC10 is one, need the collimation checking from time to time. The method can vary depending on the design - Newtonian, Schmidt Cassegrain, variations on those themes, and in this case Ritchey-Chrétien (RC). The RC design consists of two hyperbolic mirrors facing each other, a hole in the centre of the primary mirror allows light from the secondary to pass through to the eyepiece or camera., positioned at the focal plane where the image comes to focus:
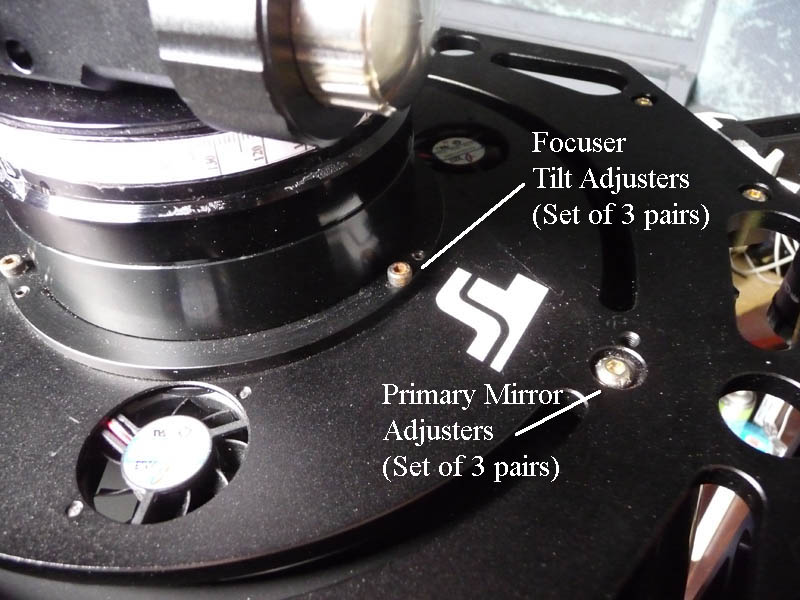
For best operation, all components should be centred and aligned with the optical axis, which is usually the physical centre of the telescope. Some components cannot be moved sideways - their positions are fixed during manufacture and hopefully are centred on the physical/optical axis. But it IS possible to adjust the tilt of the components to arrive at a 'best fit' compromise. In the case of my particular model, the primary and secondary mirrors and the focuser can all be adjusted.
There are of course different approaches to collimating these telescopes, I am simply describing the method I use, which requires an accurate laser for the initial stages, and assumes that a tilt adjustment plate is fitted to the focuser. I always have the telescope facing vertically downwards so that the laser rests level on the focuser to prevent any tilt being created by using clamping screws. As always on these web pages, click on the thumbnail for a larger image. The cursor should change shape if a larger image is available.
|
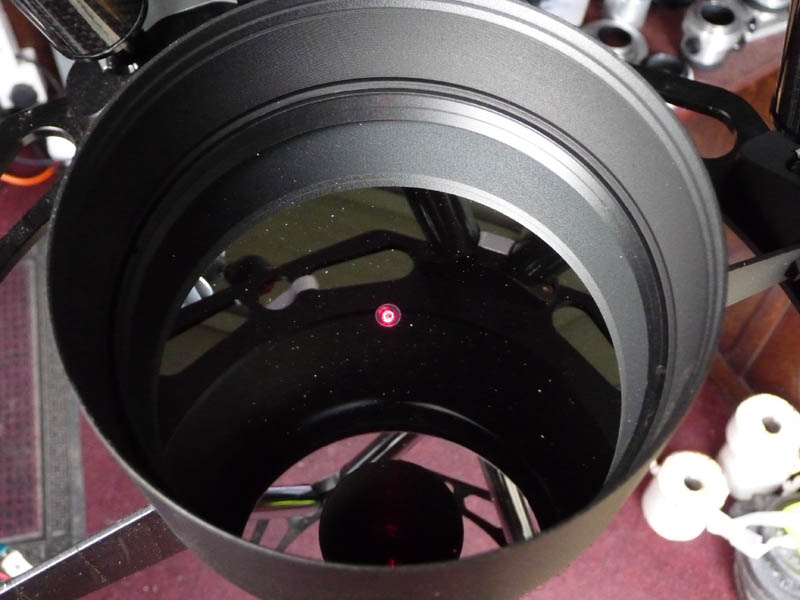
The first stage is to align the focuser with the secondary mirror. The laser is placed in the focuser, and the tilt of the focuser adjusted using the push-pull screws on the focuser tilt adjustment plate until the dot from the laser is exactly centred on the central mark of the secondary mirror. If possible have the focuser at or near the setting normally used for visual or imaging, depending on the main use of the telescope. |

|
|
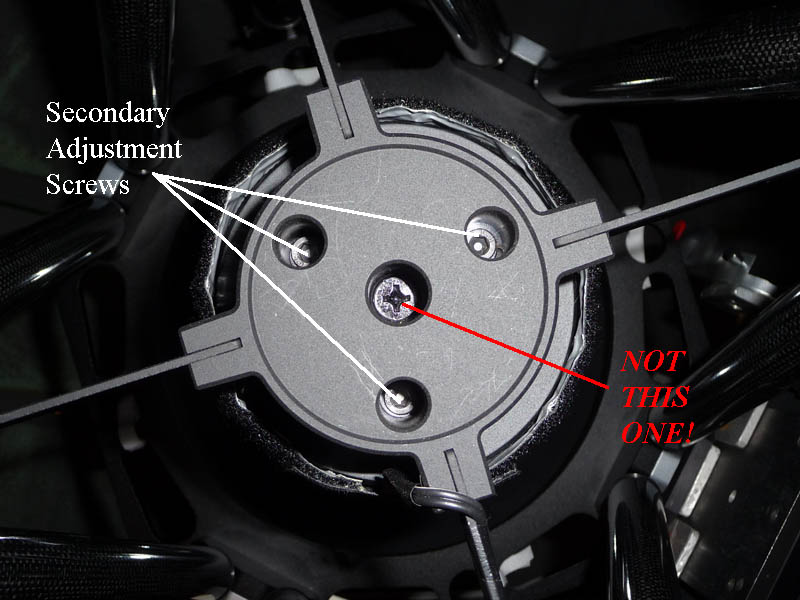
The second stage involves adjusting the tilt of the secondary mirror until the laser beam returns on itself. This necessitates using a laser with a side 'window' as shown here. Although I have warned against adjusting the centre screw, if the secondary is well out of adjustment it may be necessary to slightly slacken the centre screw. Remember to tighten it again! That is the end of the focuser and secondary adjustment procedures. They are now correctly aligned and only the primary mirror need now be adjusted. |
|
|
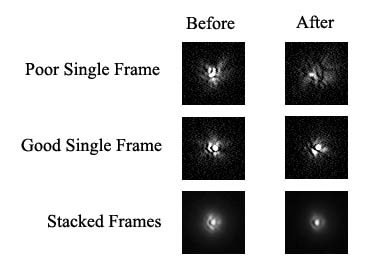
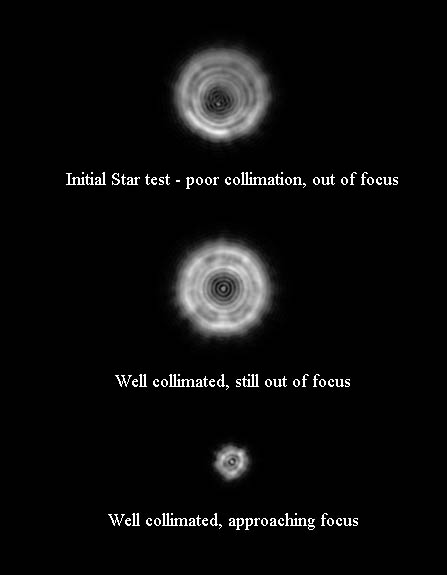
It is possible using a laser with an accurately etched 'holographic' reticle to adjust the primary mirror for final alignment, but in my case I prefer to do the final collimation stage using a star near the zenith. I use a web cam with the excellent freeware program Metaguide. With the star focused, atmospheric effects make it difficult to see exactly what is happening. But Metaguide combines several frames to produce a clearer image, This picture gives some idea of what can be seen before and after collimation. The test star doesn't want to be too bright, around second magnitude is usually suitable, but the higher in the sky the better to minimise atmospheric distortions. |
 |
|
Because the primary adjustment screws are at the rear of the telescope, it is relatively easy to adjust them while looking through an eyepiece. IMPORTANT. My focuser is fitted directly to the backplate of the telescope via a tilt adjustment plate. But on some RC models from GSO the focuser is fixed to the mirror cell assembly. If that is the case, adjustment of the primary mirror will affect the alignment of the focuser, and it is then advisable to repeat the process from stage one. Unless the primary was initially well out of collimation, one repeat may be sufficient. |
 |
|
If collimating through an eyepiece, what you are looking for is concentric rings around the slightly out of focus star which remain so as fine focus is approached. For best results a short focal length eyepiece should be used,with a Barlow lens if available. Whether collimating using a web cam or eyepiece, adjustments of the collimation screws will move the image towards the edge of the field of view, so it will be necessary to re-centre the star after each adjustment using the mount controls, assuming a driven mount for a telescope of similar size and focal length. |
 |
|
For anyone who does own a laser with a 'holographic' display attachment, there is an interesting method described on YouTube. Step 1 is here, followed by steps 2 and 3. These will open in new windows (YouTube does not like frames!) Occasionally the steps do not follow correctly, so just in case, step 2 is here and step 3 is here. |
 |