EQ3-2 Mount, modified for GOTO
(May 2003)
This setup is a very nice economical portable GOTO
system for visual observing.
BUT it is only right to point
out that the EQ3-2 mount, although sturdy, is not a High Precision
instrument. Periodic Error is quite high at around 70 arc-secs peak
to peak, and a little jumpy as well. Not really suitable for long
focal length long exposure astrophotography. As a wide field camera
mount, particularly piggybacked using the Stellarvue (or whatever
telescope is on the mount) as a guide scope, it should serve
well.
Added later (2005) Periodic
Error Control is now available for the Autostar, although the
training is lost unless the mount is PARKed. But this can reduce the
periodic error to +/- 10 arc-seconds or better, so considerably
improves the long exposure capabilities of the mount. And later
versions of the Autostar firmware accept pulse guide commands which
can give guiding down to around +/- 3 or 4 arc-seconds accuracy -
well suitable for wide field imaging.
Added later again (2008).
The #909 module originally was made available by Meade to allow 'ST4'
type guiding on the LX90. Later Autostar firmware, particularly with
'patches' from Dick Seymour (see Roboscope Group files section - link
to the Group at the bottom of this page) allows the use of this unit
with the Autostar driving DS motors. Meade stopped supplying this
unit in 2008, but a 'clone' was made available by Gene Chimahusky
here.
Particularly useful for users of SBIG self guiding cameras, or the
recent crop of economical guide cameras with built in guide ports,
for example this or
this
equivalent.
The EQ3-2 German Equatorial Mount is a mid sized mount, made in
China, and supplied as standard with a wide range of budget
telescopes, up to around 6" Newtonians and 4 1/2" Refractors. It is
quite well made and sturdy, coming as standard with 360 degree gears
on both axes and a small polar finder 'scope. Not driven as normally
supplied, although drives are available.
I had bought one ('new' secondhand) to mount my Stellarvue
AT1010, previously mounted on a camera tripod, and was
considering fitting the standard drives. But having spotted an
advertisement for the Meade DS motor upgrade kit with 497 Autostar
(see foot of page for Autostar settings) at a very good price (little
more than the standard drives), I decided to have a go at fitting it.
I looked around other sites, notably Chris
Erickson's, for ideas, and eventually (no longer having ready
access to a lathe) decided to use the existing Meade gear shafts.
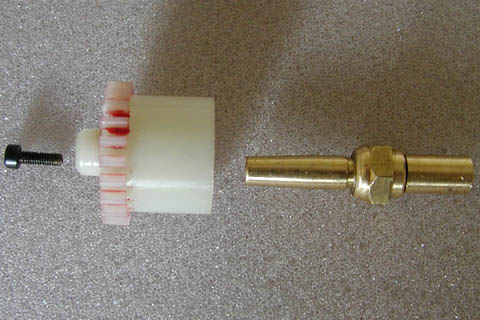
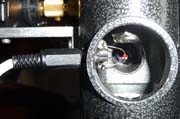
|
This shows the Meade gear removed from its taper, with
the fixing screw.
|
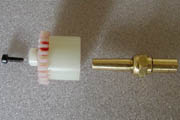
|
|
A pity to cut sound worm shafts in two, but I could only
use the taper parts!
|
|
|
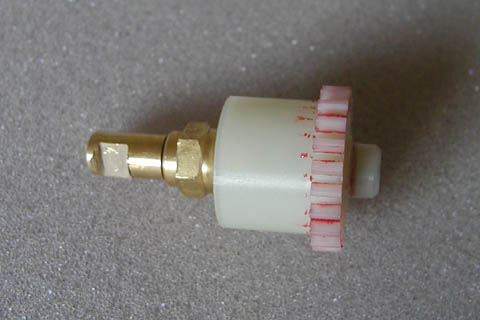
The gear ready for assembling to the mount, with a flat
filed in the shaft for the coupler fixing screw. The hexagon
nut can be unscrewed, but I left it on the shaft - it acts
as a convenient stop for the coupler.
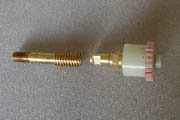
|

|
|
For shaft couplers (with 6 mm bores) I used Maplin
(UK) electrical connectors, part no. MX06, at £1.29
each (priced May 2003). They also supply shaft couplers no.
WC72P at £3.99 each, complete with hex key, but the
ones I bought were without the hex key. The 6 mm bore of the
couplers fitted the end of the gear shaft on the mount, but
I had to drill halfway through each one to 7 mm for the
Meade shafts. Brass 'grabs' the drill, so to prevent the bit
running too far, I clamped a 6 mm drill half way in.
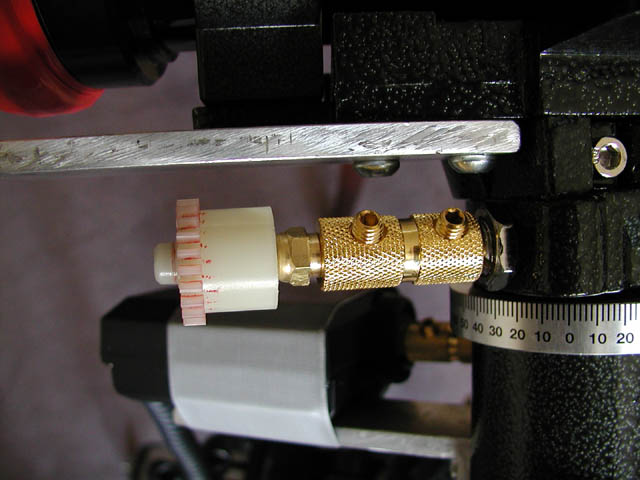
With the couplers held in a vice, the job was
straightforward. I also had to shorten the mount end of the
couplers to get sufficient depth for the mount shaft. DEC
shaft assembly shown.
NOTE (May 2013) Connector
MX06 no longer available, but WC72P is still on the web
site, still at £3.99!
|

|
|
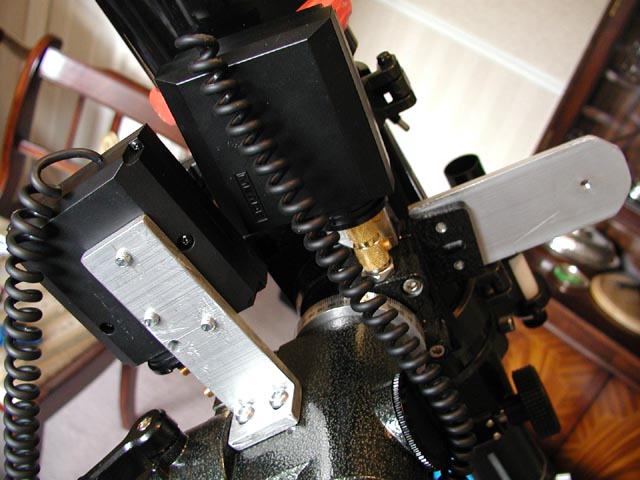
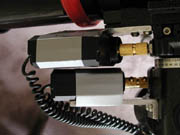
Then it was simply a matter of fixing the motors in
suitable positions. I was very fortunate in having to hand
some offcuts of Aluminium angle which fitted the bill
nicely, the longer part being exactly the right thickness to
space the axis of the DEC motor away from the top plate of
the mount.
So in the end, the only metalworking tools I needed were
a Drill, Hacksaw, File and 6 mm tap (for the fixing holes on
the mount). Don't forget the vice! Although many people
doing this mod on other mounts had to extend the RA axis,
there was just enough clearance on this mount. A
straightforward job.
|
|
|
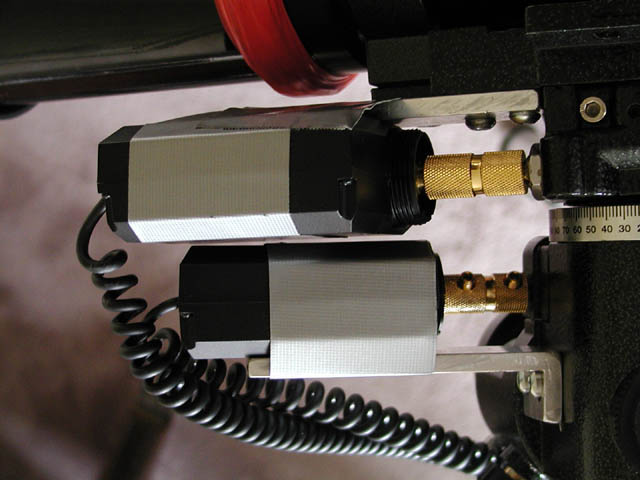
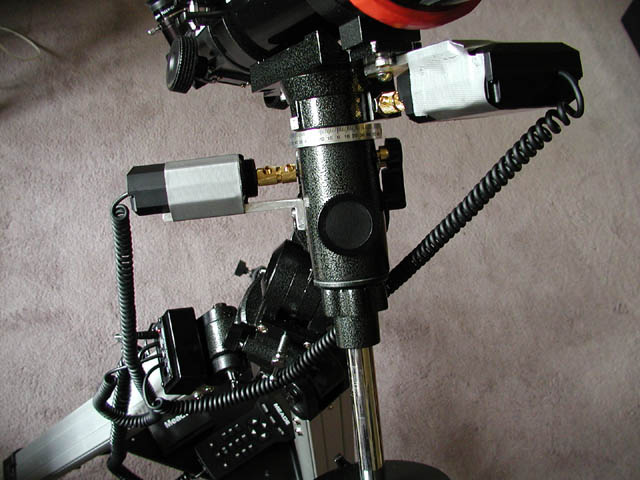
The motors are held on with Duct Tape for now - there is
very little clearance inside the motor casings, and if I use
screws they may touch the innards. At the moment the mount
performs well, putting objects nicely within a 9 mm
eyepiece.
|

|
|
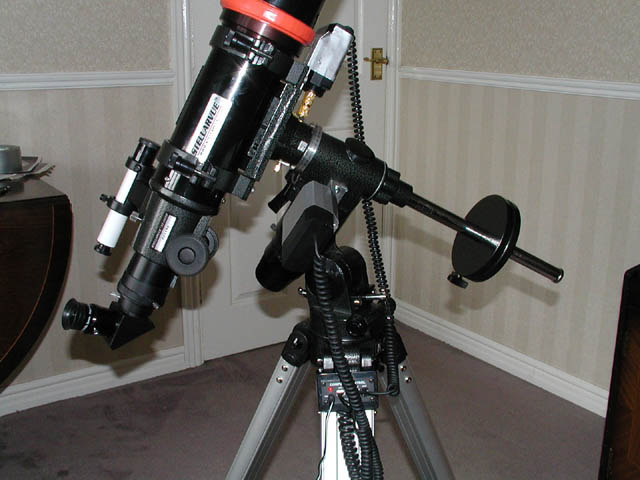
Ready for Action!
|

|
A week or so later.....
|
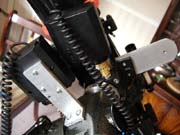
Although the duct tape did a reasonable job, there was a
little bit of movement between the motors and the mounting
brackets. I took some measurements and realised that there
was enough clearance inside the motor cases for low profile
socket cap screws, particularly if I filed them down a bit.
Although I stated above that the Aluminium was exactly the
right thickness to space the DEC drive, in fact a 0.5 mm
shim was needed for the best result - a piece of plastic was
located and cut to size (actually a label from some annual
flowers I'd just bought for the garden!).
So out with the drill and file again, some careful
aligning, and the job is properly finished. (Note the hole
in the fixing bracket for one of the case screws). Rock
solid, and I hope a little more accurate! Although not
visible in these photographs, I screwed the original motor
case mounting ring retainers firmly onto the shaft exit
holes to add a little strength.
The Aluminium plate sticking out of the side of the mount
is a camera platform.
|

|
MUCH later (2008)
|
I've sold my AT1010, but now have three telescopes which
can be used on this mount. My TMB
105, William Optics ZS66
SD and Solarview
50. So to ease swapping from one to another, instead of
having to remove tube rings from the mount I have fitted a
dovetail clamp to the mount, and with dovetails on all three
telescopes it's a matter of seconds to change telescopes and
rebalance. (As before, the plate sticking out to one side is
a camera platform)
|

|
Later again (2010)
|
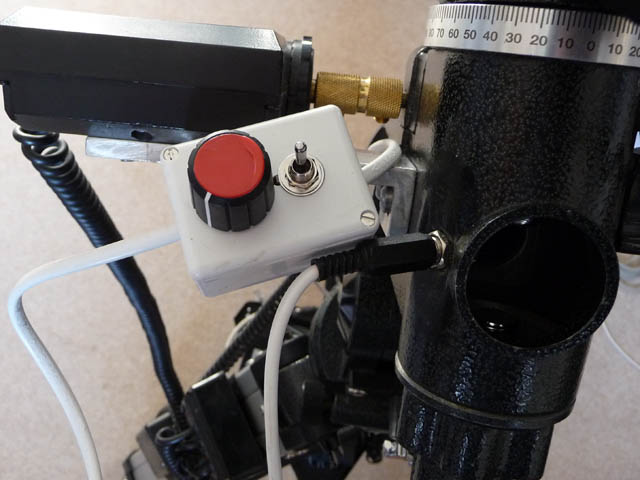
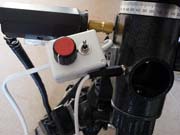
Before my trip to the Southern Hemisphere in 2010 I was
concerned about locating the Southern Pole, and bought a
replacement Polar Finder which has a reticle for both North
and South poles. It worked a treat! I knew it would need
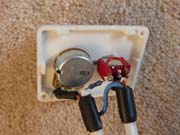
illumination in the very dark skies, so fitted a power
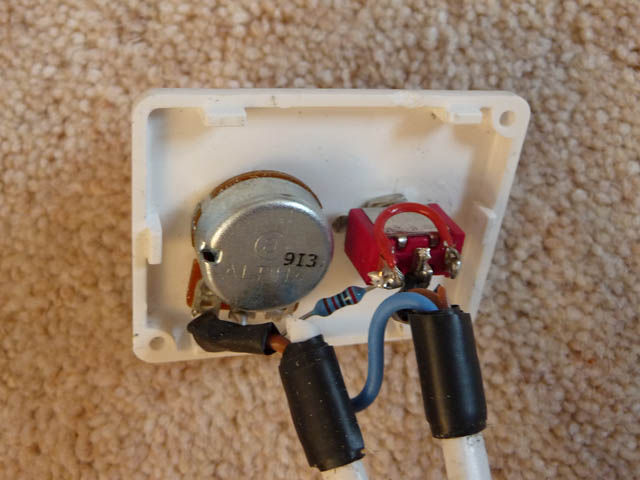
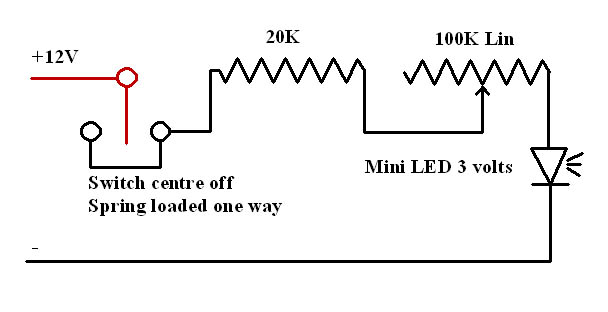
socket and little 3mm LED to the mount before travelling.
The power is fed from the mount (12 volt) supply via a
project box fitted with a switch and variable resistor to
adjust the light output to match the star brightness. Once
aligned I unplug the controller, so no untidy cabling when
observing/imaging.
BTW, I got the finder scope from First Light Optics.
This
one (the EQ3-2 version).
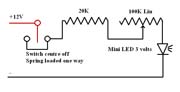
The switch is centre off, and spring loaded off in one
direction, so I can have it on permanently or blink it -
this proved very useful for South Pole alignment on the
faint Octans stars. Because the LED is rated around 3 volts,
the 20 Kilohm resistor limits the current when turned to
full brightness.
Update, 2014. Skywatcher now
supply a Polar illuminator for this mount (and some others
in their range) which clips into the polar scope exit hole.
Again available from First
Light Optics and many others world wide.
|
|
|
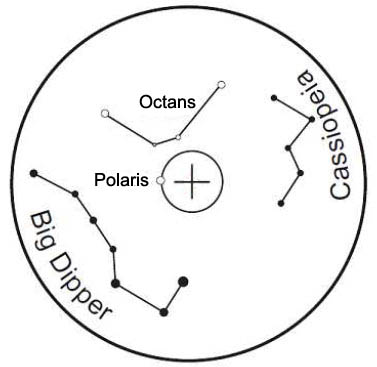
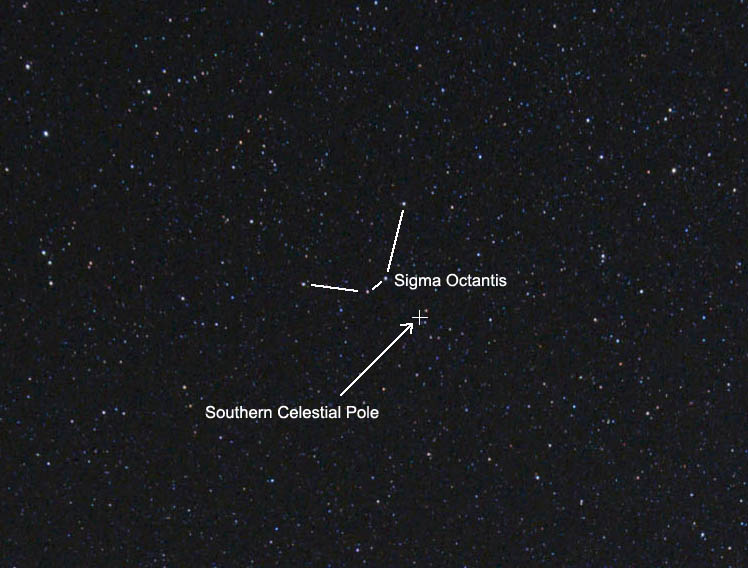
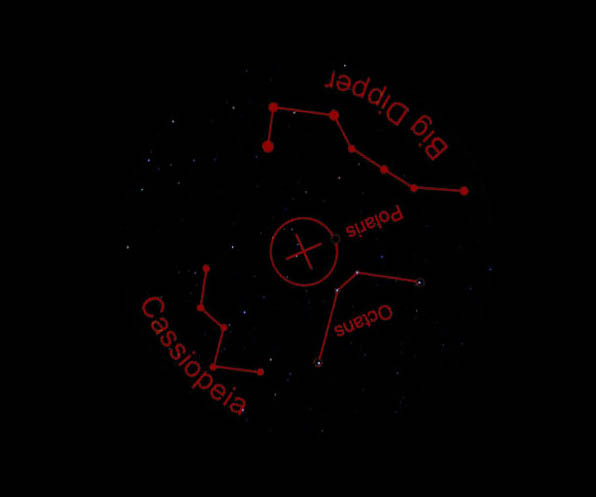
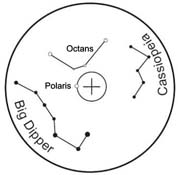
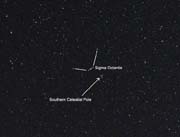
A pic of the reticle showing the Octans stars. It was
necessary to rotate the RA axis to align the stars with the
finder shape, but the spacing was accurate, and certainly
worked.
The reticle uses three 5th mag and one 6th mag star
including Sigma Octantis. I couldn't be sure of any of them
naked eye, so had to move the mount around to find them. The
pole is located approximately 2/3 of the way along a line
drawn between Acrux and (easy to find) Beta Hydri, so with
the mount altitude correctly set, it was surprisingly easy
to spot the stars in the finder.
|
|
|
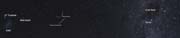
Here are actual photographs from my trip showing the
wider field and close up asterism for the finder scope. And
once you know where to look - easy-peasy!
|
|
|
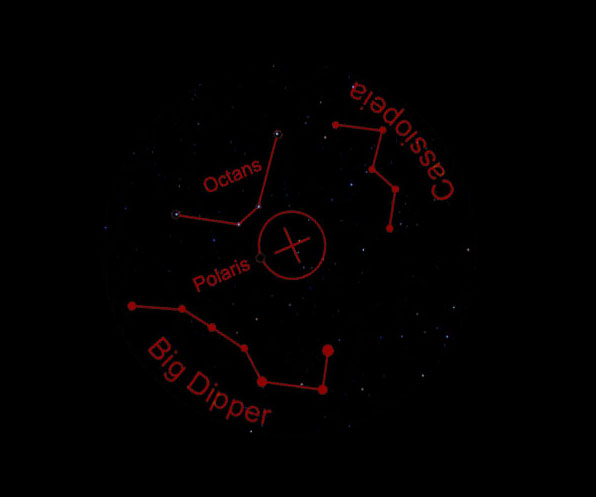
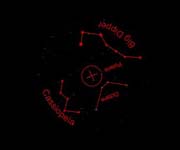
Here is the reticle superimposed on the star field, much
as it would appear through the finder (illuminated of
course!) I've seen other reticle designs, but in my opinion
this is the most straightforward for the Southern Pole -
although the stars used are faint, the grouping is
particularly noticeable when it comes into view in the
finder. (The finder view is of course rotated 180 degrees
from the sky view).
|
|
|
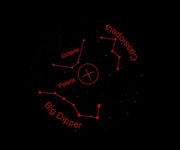
The above images were taken in July - the Southern
Winter. If there in the Summer - January etc., the sky would
be rotated 180 degrees, and the reticle alignment also
rotated, looking more like this.
|
|
Autostar Settings
The worm ratios on the EQ3-2 mount are 65:1 on the DEC and 130:1
on the RA. These translate to Autostar ratios using Steve
Bedair's method.
The multiplication factor for my DS motors is 0.02281483333 times
no. of teeth on the worm gear, therefore:
DEC ratio =01.48296
RA ratio = 02.96592
The Ratio sign is dependent upon the motor fixing position (which
side of the mount). In my case, both negative. The Autostar already
had the LXD55 series in its database, so I didn't have to use Dick
Seymour's patch mentioned on the other sites to accommodate the
German Mount.
There is a Yahoo! group, Roboscope,
dedicated to this sort of conversion.
Performance
Slew speeds are approximately 5 degrees/second in Declination
and 2.5 degrees/second in Right Ascension. Not exactly sprinting, but
perfectly adequate in use. The system acts
'intelligently', always avoiding cord wrap, and warning of any
likelihood of clashing with the mount.
GOTO's are most satisfactory, particularly when using the
Autostar High Precision mode, with objects placed well within a 9 mm
eyepiece on the Stellarvue 'scope (480 mm focal length), and tracking
is very good.
Power usage is approximately 100 milliamps when tracking and 500
milliamps (1/2 amp) when slewing at full speed with both motors
running. The supplied battery pack holder takes 10 AA size batteries.
So with NiMH batteries of around 1500 mAH capacity, a long night's
observing would be accommodated without recharging the batteries.