
Commercial wedges are very expensive. I bought my 10-inch (254 mm) LX200 second hand and a wedge was going to cost me about
half as much as the telescope did. So I decided to build my own. It is based on a design by Peter Vassey; his design is on the
LX90 Yahoo group, so you will have to join that group to see it (but you can resign again afterwards) -- go to
Files > Wedges, Piers & Mounts > DeLuxe Wooden Wedge to see detailed drawings of his design. I have added a few
little improvements of my own (I think). The dimensions were made so that the centre of gravity of the telescope
on its mount is over the centre of the tripod. The wedge is made of 18 mm plywood (actually I couldn't get 18 mm so I bought 9 mm,
cut it in half and glued the two pieces together again). All wood-wood contacts are glued and screwed. The screws are
intentionally not in line to reduce the risk of splitting the plywood as they mostly go into the edge. They need
to go into predrilled holes also to reduce the risk of splitting. One piece, the brace, did split slightly so I simply
screwed it back together again. The whole wedge was finally given a thick coating of marine varnish to protect it from moisture.
One mistake I made was not to varnish the inside before final completion when I could still get at it. However it is important
not to varnish anywhere where you are going to expect glue to hold. So varnishing before assembly was not entirely
practical in any case.
2. The Wedge.

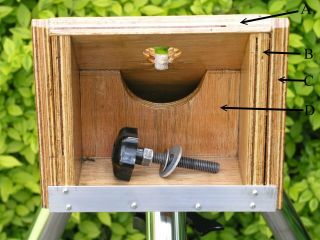
Rear view:
A. Wedge plane. This is the plane to which the telescope is attached.
B. The wedge supports. These are triangular and must be cut as carefully as possible to match your latitude.
C. Strengthening trusses. These make the whole thing much more rigid.
D. Bracing. The hole is cut to give easy access to the fixing bolt which goes up through the plane.
You can also see the fixing bolt which I insert through the wedge plane and screw into the base of the telescope once that is in place.
The metal edge is simply there so I can use this space as a small shelf and the eyepieces and things don't roll off.

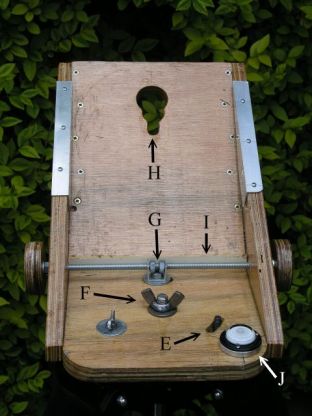
Front view:
The wedge is held in place by the original bolt that bolted the telescope to the tripod in Alt-Az mode (F)
and by three bolts threaded up into the top of the tripod. These latter three bolts pass through curved slots in the base
to allow some rotation of the wedge in azimuth. I put a CD (thanks AOL!) between the top of the tripod and the wedge to make it
slide a little more easily with the centre bolt done up really tightly. These bolts are tightened down with wing nuts and washers
and I have removed one here to show the slots cut in the wood (E). The amount each bolt sticks up is controlled
by a nut on the underside of the tripod which is tightened up against the base of the tripod to lock the bolt in place.
The bolt at the back attaches to the az adjustment screw. This is a long threaded rod that passes through the whole
wedge with nuts and washers on the outside to make it a very slightly loose fit. In the centre at (G) are two
more nuts inside a U-shaped piece of metal which is attached to the bolt coming up from below. These nuts are
constrained from rotating with the rod by being up against the nut that attaches
the U-shaped bracket to the bolt.
(Simple but it works!)
Not very clearly shown but an important part of the design is a piece of wood crossing the assembly at the base of the
sloping plane and at right-angles to it (I). When the telescope is first lifted onto the wedge, the control panel
rests on this piece of wood which puts the fixing hole right over the place where the bolt comes through from below.
The hole for the fixing bolt is at H. This is the shape it is because originally I was going to have the bolt
permanently in the base of the telescope and its head would have passed through the larger part of the hole.
However I could not then keep the telescope on its base so I abandoned that idea.
J is the Alignmate. This is (in my opinion) useless for its originally-intended purpose (aligning and levelling an ETX)
so I have incorporated it here as an aid to levelling the tripod prior to putting the telescope onto it.
Finally the metal edge pieces are there solely to protect the wood which was taking a bit of a battering as I put
the telescope (which is no light weight) onto the wedge.

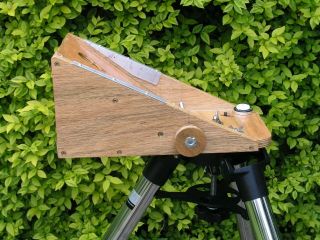
Side view:
Note that the wedge is orientated so that one leg of the tripod is due south. This leg is used for
fine adjustment in alt. Adjusting this leg proved to be not nearly as difficult as I feared it would be. If the leg
is too short, I lean on the whole structure enough to lift that leg slightly off the ground and extend the leg a
little too much. If it is too long, I find that, if I hold the lower part of the leg where it goes into the clamp,
as I loosen the clamp I can feel a tiny movement and adjust as needed.

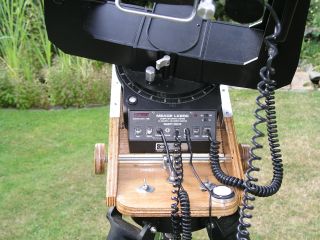
The LX200 on its wedge:
Note how the control panel rests on the ledge
at the base of the sloping plane. This makes it much easier to get the telescope
onto its wedge as it locates the fixing hole right over the hole in the plane.